Sunday, December 24, 2006

Mushroom Potstickers

I made potstickers tonight, (well defrosted some I'd made earlier) for our Christmas Eve supper.
My kids wanted an Asian theme and had grand ideas about all sorts of stuff, but they were out babysitting until late and I was busy until after 5 as well, so I got Hot and Sour Soup as take-out, and then defrosted and fried up these babies (made and frozen a few weeks back) after rushing around with the last of the Christmas Shopping. Everyone was thrilled and declared it our "official" Christmas Eve Supper from now on.
...We'll see about that...


Allow me to go off on a tangent here, but, how is it that every year, I SWEAR I'm finished around the 20th of December, or so, and about 2:PM Christmas Eve I suddenly remember 25364728 little details I forgot?

Grrrr... batteries for the Ipod, and digital camera, and GameBoy; Starbucks Giftcards for the paperboy, the babysitter and anyone else I neglected (sorry if that was you.)

Anyway...these Potstickers are super easy and the recipe is tasty even if you have to play around with ingredients... definitely use fresh ginger and garlic thogh, not those dried imposters!
I'm off to wrap the last of the gifts. Happy Holidays to all of you. Enjoy.

Mushroom Potstickers

3 cups finely shredded green and purple cabbage - sometimes I shred kale as part of the mixture too.
4-5 good sized dried shiiake mushrooms (reconstituted = 1/2 cup diced) -
If you can't get these, just use 1/2 cup more
of the button mushrooms, but the shiitakes
add a depth of flavor that's hard to match.
1 cup minced fresh button mushrooms
1 teaspoon garlic, minced
2 teaspoons finely shredded fresh ginger
4 Tablespoons green onion, diced
1-2 teaspoons rice wine vinegar, to taste
salt and pepper, to taste

24 egg free gyoza (pot sticker/dumpling) wrappers

Saute everything except the ginger, green onion and rice wine vinegar until soft. Remove from heat and mix in the remaining ingredients.
Adjust seasoning to taste.
Set aside to cool.
To fill wrappers:Lay out a gyoza wrapper and place one scant teaspoon-full mounded in the center. run a wet finger around half the outer edge of the wrapper and fold over, pinching the seams together as snugly around the filling as possible. You can crimp the edges like a fluted pie crust if you like.
Set aside and continue with the rest of the dumplings.

When they are all constructed, steam in a rice-cooker, vegetable steamer or bring a pot of water to a boil and place a steamer basket inside.
Grease or pan spray the insert to prevent sticking and lay the dumplings in one at a time so that they do not overlap. Cover and steam for 10 - 15 minutes per batch.

You can store in the fridge or freeze at this point.

To serve: Boil in a clear broth soup or fry in a skillet with a bit of oil to brown on one side IF you want - or just eat them steamed.
Serve with ponzu or the dipping sauce of your choice.

(I usually throw together a sauce made of equal parts rice wine vinegar, soy sauce, a few drops of sesame oil and a squirt of Sriracha, or else use Sweet Chili Sauce - our household standard condiment)

Tuesday, December 19, 2006

Today we were all in the mood for something very chocolate-y, and since it's the first week of Winter Break, the perfect time to bake some decadence and chocolate. So, I rummaged through some recipes and found this one for Christmas CandyCane Brownies. I'd been in search of a decent vegan brownie recipe for a long time, and no matter what, they all kept coming out soggy or greasy. Gack!
But I'd been playing with this recipe for quite a while, and finally managed to perfect (well, "perfect" being a relative term of course) it last summer (without the candy-cane topping because candy-canes are hard to find in mid-July ) so decided to let the Sprouts try their hand at baking them. The end result was great of course!!


Christmas Candy Cane Brownies
1 1/4 cup white flour
1 cup whole wheat pastry flour
1 Tb. egg replacer powder powder
1 cup water
1 cup white sugar
1 cup brown sugar
1 teaspoon salt
1 teaspoon vanilla extract
3/4 cup unsweetened baking cocoa powder
1/2 cup oil
1/2 teaspoon baking powder
1/2 cup vegan chocolate chips

Mix dry ingredients (flour, sugar, salt, cocoa, baking powder, egg replacer powder) You can sift if you want but not necessary.
Then mix the wet ingredients (water, oil, vanilla).
Mix wet into dry together, 50 strokes, or until well blended.
Fold in chocolate chips.
Spread mixture into a greased 13x9" pan.
Bake at 350 for 25- 30 minutes, or until a knife comes out clean.

When cool, we frosted with the white frosting from 'Vegan Cupcakes Take Over The World' (to which we added some Peppermint Extract) then topped the brownies liberally with crushed candy canes. As you can see, SOMEONE (not mentioning any names here*cough*starts-with-an-O*cough*) couldn't wait to try them, even before I'd gotten a picture!

Monday, December 18, 2006

Baby Cabbages

So I've had some of those Tofurky Sausages sitting in the fridge, and had been thinking about doing something with them; some fried cabbage and "sausage" sort-of-thing. Since I didn't have cabbage, I used some golf-ball-sized brussel sprouts that were still hanging around my garden - I figure brussel sprouts are just baby cabbages, right?

I shredded them thin on the mandoline cutter, threw 'em in a pan with the "sausage", carrot and part of an onion. It turned out SO incredibly yummy! A great winter lunch. You need to go get yourself some brussel sprouts and try this!

I don't have a recipe exactly, but here's a couple pictures and the basic idea:


12 large brussel sprouts, or so, sliced thin on a shredder/slicer
1 carrot, coarsely grated or thinly sliced
1 link (or more) Tofurky "sausage" sliced
1/4 white onion, sliced thin
Saute with a tsp. or two of olive oil, a splash of red wine vinegar and salt to taste - until vegetables wilt and are tender crisp to your preference.
Some red peppers would be nice here too, they go great with the "sausage".

Sunday, December 17, 2006

Winter Storms and Simple Vegan Pancakes


So this is our third day with no power. The excitement has worn off for The Sprouts. But the downed trees (see pic!!) have been removed from the nearby roads, so we ventured out to the local Tully's Coffee which actually has power - AND free Internet (as well as the best coffee in the WORLD in my opinion) but I digress...


So we're sitting here with our laptops crackling, our cellphones charging (borrowing yet another outlet from the kind Tully's folk) and soy Peppermint Mochas (cocoa for Little Sprout of course) warming us.

We're also lucky in so many other ways - no trees fell on our house, (that's a big thing, since I'm surrounded by huge evergreens - see above pic) and since we use gas for cooking and hot water, even with no lights or heat, we can still cook and bathe - I figure with warm meals and showers we can weather just about anything a little longer.

Nothing clever as far as recipes today. Here's the pancakes I made for breakfast - sorry the picture isn't at all glamorous. Probably the simplest vegan pancake recipe out there and pretty much fool-proof. I'm posting it here (with permission) just as it's written by my friend, Froggy, from my fave website Veggieboards.com .


Easy Basic Vegan Pancakes


Dry Ingredients:
1 cup whole wheat pastry flour or 1/2 whole wheat and 1/2 white
1 tablespoon baking powder (aluminum-free recommended)
1/2 teaspoon salt
Liquids:
3/4 cup milk (rice or soy milk should work just fine -- almond milk works well)
1/4 cup applesauce

Instructions:
Combine dry ingredients well in a bowl. In another container, combine the applesauce and milk. Pour the liquids into the dry ingredients and combine till all the flour is a very moist btter consistancy but still a little lumpy.
Heat up a pan -- I recommend an iron skillet with some spray oil on it -- and get it good and hot. Have a plate ready to catch completed pancakes.

Take a 1/4 cup measure (like the one you used for the applesauce) and scoop up some batter and pour into the pan. You should hear it sizzle. (Don't pour any more in!) Wait until the pancake becomes bubbly and the bubbles look like they might want to stay, then turn the pancake over. Cook the other side for 30-45 seconds.

Put the completed pancake onto the plate and repeat the great batter pouring process until you run out of batter.

Saturday, December 16, 2006

Christmas Goodies: Rum Balls ;)

Another Christmas get-together and another excuse to make something totally vegan but so wicked-rich and yummy.


These are not healthy by any means, but since when have Christmas parties been "healthy"? (Yeah, I know, a nice thought...).

Not a recipe I share with The Sprouts either, since it does contain a bit of rum.... such a party-pooper I am.

Cocoa Rum Balls

3 tablespoons unsweetened cocoa powder
1 cup confectioners' sugar (Florida Crystals makes organic, non-bone-char powdered sugar, as do a couple other companies)
3 cups vanilla wafers (or any vegan crisp-biscuit-type cookie), crushed or ground in food processor
4 tablespoons dark corn syrup (or maple syrup or agave nectar, which will give it a milder flavor)
1/2 cup dark rum - I use Capt'n Morgan's (more or less, depending on personal tastes - bwa-ha-ha-ha)
extra cocoa, powdered sugar or ground chocolate, to roll the rum balls in

In a large bowl, sift together the cocoa and confectioners' sugar. In a food processor or blender crush/crumble the vanilla wafers or cookies. Add the crushed cookies to the sugar mixture and combine. Add the remaining ingredients. Form the mixture into 1 inch balls with your hands.
The balls should hold together easily and retain their shape.
If the mixture is too dry to hold together or too wet to form balls, you can easily adjust the consistency by adding rum/sugar accordingly.

Sprinkle the powdered sugar, extra cocoa or ground chocolate on a plate and roll the balls in to coat. Store in a sealed container. Best if allowed to "age" for a week or so, if you can stand it.

Thursday, December 07, 2006

Oliva-Tofu-Pecan Dip

First Christmas Party of the season tonight:


Didn't have a whole lot of time last night and wanted something that I could mix up ahead of time, so I brought this super-mega-easy-yummy dip, and some rather generic crackers. My mom actually gave me the recipe a few years back - Good stuff!!

No one asked or cared if it was vegan and the bowl was cleaned out when I left so I guess that's a good sign. Seriously, this is my stand-by when I need a 'spread' sort of thing and have to impress omnis. It's good with celery and carrots or in a sourdough bread bowl too.


Olive-Tofu-Pecan Spread


1 cup firm tofu, mashed fine with a fork
1/3 cup pecans, ground fine but not totally into powder, in food processor or blender
2/3 cup black olives, chopped (you can use a couple Tbsp. kalamata olives if you want extra tang and saltiness, but it's good with standard old black olives too).
1/2 cup finely chopped celery
1/4 finely chopped onion (or chop celery and onion in food processor)
1 1/4 tsp onion powder
1/4 tsp. garlic powder
1/2 tsp. seasoning salt
1/2 cup Vegannaise (or equal parts Tofutti Sour 'Cream' and vegan mayo)

Mix ingredients well. Enjoy! That's it!

Monday, December 04, 2006

Tofu Thoughts

FRESH TOFU

Woo-hoo! Jackpot!

Went to my favorite Asian grocer tonight, and they had just filled the bulk buckets in the cooler with fresh tofu.
Their fresh (not the stuff in the little plastic box) tofu sells out within a couple HOURS, so I rarely manage to get my hands on any. You just grab a chunk out of the water with the tongs, put it in a plastic bag. Tonight I stocked up - it keeps for quite a while if I put it in a Tupperware and change the water daily - and it freezes great!

If you've never had fresh (I mean REALLY amazingly fresh) tofu from a bulk bin or tub, I suggest you try it - it's SOOOOO good! Trina, my Vietnamese friend, told me about this particular market - said they're known for having the best tofu in town. I have to agree, and now I'm spoiled - this is the only way I'll buy the stuff.

OK, so what to do with it?


Not that I have ANY trouble findng a use for tofu, but Littlest Sprout wanted "Chicken Tofu Sticks" (with barbeque sauce of course!!) and since it's so quick and simple and we were running late - well, we basically made a meal of fried tofu and salad. Maybe not the most healthy supper on the planet, but I can think of worse.

I'm not really sure where this recipe came from or if it ever WAS a recipe, but I've been fiddling with it for years (like most of my recipes); since my oldest still likes real (*gasp*) chicken when out with her Dad once in a while, I've tried to season these sorta the way she likes. Go with less cayenne or lemon pepper if you prefer. Cold, the next day, these things are very scarily chicken-like...

"Fried Tofu Chik'n-Style"

6 Tbsp. cornstarch
3 Tbsp. Nutritional yeast
1/2 cup finely ground dry bread crumbs
1 teaspoon dry vegetarian "chik'n" bullion/broth powder

1/2 tsp. sage
1 tsp. garlic powder
Dash of cayenne pepper

lemon pepper to taste

1/2 cup soymilk
1/4 cup Vegenaise or other vegan mayo. of your choice
2 Tb. nutritional yeast
peanut oil for frying
1 pounds firm, fresh tofu, drained, blotted dry and cut into "sticks".


In a small bowl, whisk the Vegenaise, soymilk and 2 Tb. nutritional yeast; in a separate dish, toss the cornstarch, breadcrumbs and nutritional yeast with the salt and spices.

Heat 1/2 inch of oil in a cast-iron or non-stick pan. (I know, I know!!)

Dip each tofu stick in the soymilk mixture to coat, then roll in the breadcrumb mixture, pressing the mixture on. Carefully lower into the hot oil and cook for 2 minutes. Turn with tongs and continue cooking until they are golden brown. Drain on paper towels and serve immediately with dipping sauce.

Thursday, November 30, 2006

WHERE DID ALL MY POSTS GO!!

ATTENTION!!
OK, so when I switched over to the "NEW AND IMPROVED" Beta Blogger....... HALF MY POSTS DISAPPEARED!!
Fortunately I have them all archived and will get them RE-POSTED back here VERY SOON and I'll have my site current again!
So much for "NEW AND IMPROVED!" Ha!
ANYWAY: Stay tuned for updated Kitchen Ramblings and Recipes COMING BACK SOON!

Tuesday, November 28, 2006

Winter Kale!

Wow! After several days of freezing temps and unexpected snowfall last week, I haven't ventured into the garden until today. I was thinking there wouldn't be anything much to look at but I was surprised (and pleased) to find that I still had a bit of Russian kale and tons of Lacinato (also known as: cavolo nero, Tuscan, blue, black or dinosaur) kale growing!

I absolutely LOVE kale,it's so beautiful! The dinosaur kale and Russian are probably my favorite greens.

So, I picked a couple heaping handfulls and made it into a really wonderful soup. I love this stuff on cold winter days. It's so easy, it always turns out great and though I admit my kids aren't totally thrilled with it yet (it's growing on them though) my non-vegan friends LOVE the stuff!

Kale and Sausage Soup

6 ounces Tofurky kielbasa (or Soyrizo works well too) , sliced,
1 large onion, chopped,
1 large clove garlic, chopped
1 teaspoon olive oil
1 pound fresh kale, washed,
26 ounces vegetable or "chicken" broth
4 cups water
2 carrots, sliced
1 teaspoon dried leaf marjoram, crumbled
1/2 teaspoon salt
1/8 teaspoon pepper
1/2 cup uncooked long-grain white rice

Saute Tofurky, onion and garlic in oil in large pot over medium-low heat until tender, about 10 minutes.

Cut off stems of kale and slice into 1/2-inch pieces. Keep stem pieces separate. Coarsely chop fresh leaves.
Add the broth, water, carrot, marjoram, salt, pepper and kale stems.

Bring to boiling. Lower heat; cover and cook for 15 minutes longer. Add the leaves at this point along with the rice to the pot. Bring to boiling. Lower the heat; cover and simmer for 15 minutes or until the rice is tender.

(I usually add a good shot of Tabasco at this point too).

Soooooooo yummy! Ahhhhhh... I wonder if I have leftovers...

Saturday, April 22, 2006

New Mexico, Pineapple Tamales and stuff

Can't believe it's already April! Just got back from a wonderful (and W-A-Y too short) week in New Mexico.


Let's see - we sorta played 'tourist' for part of the time - went to Carlsbad Caverns which was SOO cool, and visited the Alien Museum in the tacky-tourist town of Roswell (home of rumored alien landings) and of course spent time in Albuquerque.
Of course, we had several cooking adventures while there, one of my favorite was the tamales. I'd made them a couple times at home, but this time, we made a really good variation - PINEAPPLE tamales. Emril made some on Food Network a while back that intrigued me, but they had raisins in them. We left those out. We also subbed coconut oil for the lard. Obviously!

OK, so they turned out pretty yummy, though maybe a wee bit bland. I think I'd like to try them again, and maybe spice them up - put a little cilantro and jalapeno in just for the heck of it...who knows...
We froze the extra ones, there was no way we could eat all of what the recipe made - it says it makes 24. 24 by whose measurement, I'd like to know - I swear it made about 50!
Pineapple Tamales

1 8-ounce package dried cornhusks
1 medium-size fresh ripe pineapple, peeled, cored and cut into rough cubes
8 ounces (1 cup) coconut oil, slightly softened but not at all runny
1 1/3 cups sugar
Salt
1 1/2 teaspoons baking powder
2 pounds (about 4 cups) fresh coarse-ground corn masa for tamales
OR 3 1/2 cups dried masa harina for tamales mixed with 2 1/4 cups hot water

1. Cover the husks with very hot water, weight with a plate to keep them submerged, and let stand for a couple of hours until the husks are pliable.
For forming the tamales, separate out 24 of the largest and most pliable husks—ones that are at least 6 inches across on the wider end and 6 or 7 inches long. If you can’t find enough good ones, overlap some of the large ones to give wide, sturdy surfaces to spread the batter on. Pat the chosen husks dry with a towel.

2. Prepare the batter. In a food processor or blender, coarsely puree the pineapple. Measure out 2 cups puree. With an electric mixer on medium-high speed, beat the coconut oil with the sugar, 1 teaspoon salt and the baking powder until light and fluffy in texture, about 3 minutes. Continue beating as you add the masa (fresh or reconstituted) in three additions. Reduce the speed to medium-low, then add the 2 cups pineapple puree. Continue beating for another minute or so, until a 1/2-teaspoon dollop of the batter floats in a cup of cold water (if it floats you can be sure the tamales will be tender and light).
Beat in a little additional water if needed to give the mixture the consistency of soft (not runny) cake batter; it should hold its shape in a spoon.
For the lightest textured tamales, refrigerate the batter for an hour or so, then rebeat, adding enough additional water to bring the mixture to the soft consistency it had before.
3. Set up the steamer. Steaming 24 husk-wrapped tamales can be done in batches in a collapsible vegetable steamer set into a large, deep saucepan. (I use my rice cooker/steamer) To steam them all at once, you need something like the kettle-size tamal steamers used in Mexico or Asian stack steamers, or you can improvise by setting a wire rack on 4 coffee or custard cups in a large kettle.
It is best to line the rack or upper part of the steamer with leftover cornhusks to protect the tamales from direct contact with the steam and to add more flavor. Make sure to leave tiny spaces between the husks so condensing steam can drain off.
4. Form the tamales.
(OK, I admit - I borrowed this paragraph from a tamale-making website)
Cut twenty-four 8 or 10-inch pieces of string or thin strips of cornhusks. One at a time, form the tamales: Lay out one of your chosen cornhusks with the tapering end toward you. Spread about 1/4 cup of the batter into a 4-inch square, leaving at least a 1 1/2-inch border on the side toward you and a 3/4-inch border along the other sides (with large husks, the borders will be much bigger). Pick up the two long sides of the cornhusk and bring them together. If the uncovered borders of the two long sides you’re holding are narrow, tuck one side under the other; if wide, then roll both sides in the same direction around the tamal. (If the husk is small, you may feel more comfortable wrapping the tamal in a second husk.) Finally, fold up the empty 1 1/2-inch section of the husk (to form a tightly closed "bottom," leaving the top open), and secure it in place by loosely tying one of the strings or strips of husk around the tamal. As they’re made, stand the tamales on their folded bottoms in the prepared steamer. Don’t tie the tamales too tightly or pack them too closely in the steamer. They need room to expand.
5. When all the tamales are in the steamer, cover them with a layer of leftover cornhusks; if your husk-wrapped tamales don’t take up the entire steamer, fill in the open spaces with loosely wadded aluminum foil (to keep the tamales from falling down). Set the lid in place and steam over a constant medium heat for about 1 1/4 hours.
Watch carefully that all the water doesn’t boil away and, to keep the steam steady, pour boiling water into the pot when more is necessary.
Tamales are done when the husk peels away from the masa easily. Let tamales stand in the steamer off the heat for a few minutes to firm up. For the best textured tamales, let them cool completely, then re-steam about 15 minutes to heat through.

Sunday, April 09, 2006

Sprout in Peru!

Yes, Peru.
No, not me! My oldest Sprout, "J.", recently got the opportunity of a lifetime, when my parents offered to take her with them on a Mission trip to Peru!

My parents go on volunteer trips all over the world, with
Maranatha Volunteers International every year, and this year they decided to invite my J-Sprout along.

So March 30, a couple weeks ago - they took off for Peru.
Yes, I was slightly teary-eyed, because even though my NOT-so-little Sprout has been away from home many times, to camp and such, she's never been out of the COUNTRY - and so far away, for so long... I'm just glad she was with her Grandma and Grandpa!

They went to a small village near Peru's capitol city, Cuzco. I guess I shouldn't say "near", because after landing in Cuzco, they had a 5 hour bus ride over narrow mountain roads to get to their work location. Once there, they stayed for a week, building a medical clinic and a small church/meeting hall and piping in fresh water for the local people. My Sprout worked right alongside the adults; lifting bricks, mixing cement and hauling sand. Her grandparents (AND I!) were very proud of her!
After their week of volunteer work, J-Sprout and grandparents headed off for more 'tourist-y' activities like visiting Machu Picchu and Lake Titicaca.


So, if you've read this far, this blog does have a 'food' point to it - and here it is: When returning from Lake Titicaca the tour group stopped in the town of Puno at a local restaurant.

My Mom, a L/O vegetarian, was fluent enough in Spanish to order a soup that they made up special just for her and my J-Sprout. (this place was pretty "tourist" oriented, so they catered to a lot of picky people and special needs). Better yet, when my Mom complimented the chef on the wonderful soup, he came out to their table and actually wrote down the recipe (in Spanish)!

Of course this recipe was one of my Sprout's favorite souviners from the trip and she had me make it her first week back. She said it was better at the restaurant (of course! ha!) but she did ask me to make it again just a couple days later, so she must like it. I know I sure did!

The soup uses already-cooked quinoa (a staple in Peru), and the vegetables are chopped very small, so it cooks very fast. Great way to use up leftovers, though when I make quinoa (I use my rice-cooker), there's rarely much in the way of leftovers.

____________________

Puno Soup


2 cloves garlic, minced
1 cup onion, chopped very small
1 large potato, peeled and cut into matchsticks
2 ribs celery, cut very small
1 med. carrot or sweet potato, cut into very small cubes (
or shredded, though it makes the soup look more "messy".) (The recipe said carrot, but my Mom, who dislikes carrots, swore it was more pale and starchy, like a sweet potato)
1-2 jalapeno peppers, to taste, seeded and minced
1 Tb. olive oil (original recipe uses butter - this is the only change I made to make it "vegan")
3 cups vegetable broth
3 cups water
1/4 cup tomato sauce
1 cup cooked quinoa
2 cups fresh spinach, thinly sliced
Salt, freshly ground pepper and hot sauce to taste

Place garlic, onion, potato, celery, carrot and jalapeno in a skillet with olive oil. Saute until vegetables start to get slightly tender.
While vegetables are sauteeing, bring water, tomato sauce and broth to a boil in a med. saucepan.
Add vegetables and cooked quinoa. Bring to a boil, reduce heat, cover, and cook for 10 minutes or until potatoes are very soft. Add spinach and cook an additional 2 - 3 minutes.

Taste and adjust seasonings; add salt, pepper, hot sauce or whatever works for you.

And for those who have read this far and are still interested in the unique foods of South America, this is a GREAT blog:
Vegan Findings in South America . They have some great photos too! Look at them since I haven't got mine uploaded yet.

Thursday, March 16, 2006

Kid-Friendly Mini-Pizzas

A windy day in March, (see all the downed tree branches in \/ picture below). My oldest is babysitting two little guys here at the house. I'm not sure how much work it is for her, since they happen to be good friends with my Little Sprout and they've been outside all morning....

I told her she had to come up with lunch that all the little munchkins would eat (and like) and she rummaged around my almost empty cupboards and put together these cute mini-pizzas; They have whole wheat English Muffins, spaghetti sauce, Tofutti "mozerella" slices, olives, canned mushrooms (blechh - I had no idea I had a can of those, they look like snails to me! Oh well, the kiddos seemsed to like them!) some mock-chicken stuff and red peppers. All those veggies and weird things and the little guys ate 'em just fine!
I was surprised the 'Tofutti' soy cheese (sorta) melted in the oven - even if it did take a while!!
Not sure I need an exact recipe, but thought I'd post anyway since I was proud of her creativity, and the kids are so dang cute!

Sunday, March 12, 2006

St. Patrick's Day Bake Sale Cupcakes

Vegan Bake Sale Insanity

Naturally the girls' school just HAS to have a bake sale on St. Patrick's Day (I wonder why we can't salute the patron saint of Ireland with something more appropriate like snake cookies or something) and as is typical, I don't find out about it until 7:PM the night before, which leaves us scrambling to make some thing "eye-catching and appealing to grade-schoolers"...ugh...
Don't laugh!
I really wasn't looking forward to a vegan baking challange at 7 in the evening, but what to do...

Could we do this and maintain the vegan-ness of our kitchen? We wondered (well, OK, I wondered...) if it wouldn't just be easier to go buy some boxed mixes but after taking stock of what cake recipes I actually had, and what ingredients were in the cupboards, we came up with some pretty-good, but disgusting green, sugar-overloaded little bake-sale worthy goodies...

I'm really proud of all the effort my middle Sprout put into helping bake these...

Instead of cupcakes (how traditional!) we made mini-Bundt cakes (about the size of cupcakes) in a White Cake (with some confetti sprinkles added for an obnoxious colorful touch) drizzled with green icing, AND some Chocolate Decadance mini-cakes with chocolate glaze and (of all things!!) green sugar sprinkles!! ALL of it vegan. (OK, well, I can't vouch for the sprinkles 100% because though I usually buy animal-free ones now, we used whatever we had in the house last night!).

This is not one of my shining moments as a Vegan (or healthy) cook, but my kids were absolutely thrilled with the results - as were all the sugar-grubbing little gradeschoolers who bought out the Bake-Sale's mini-cakes within 15 minutes!! And no one complained that they were "VEE-GUN"!

___________


The first recipe is a simple and basic white cake mix that I veganized without really realizing it, some time back... we added some multi-colored candy sprinkles to the batter. (Looks like that "Funfetti Cake" crap you can buy in a mix, only ours was better). It uses Egg Replacer, which you can find at Whole Foods and most health food stores, however, I have made it without the egg replacer and it came out fine - a bit more moist and dense, but still good.


White CupCakes


1 1/3 cups sugar
1/2 cup non-hydrogenated vegan margarine
3 cups unbleached flour
1 T. baking powder
3/4 t. salt
1 Tb. EnerGee Egg Replacer powder
2 cups soy milk, rice milk, or other non-dairy milk of choice
1 T. vanilla
1 t. almond extract
1/4 cup confetti cake decorating sprinkles
Lightly oil a 9x13-inch pan and set aside. (Or in this case, we used Mini-Bundt pans.

Using an electric mixer or in a large bowl with a hand held mixer, place the sugar and mqargerine, and cream together until light and fluffy. In another bowl, sift together the flour, baking powder, Energee Egg replacer and salt.
Add dry ingredients into the creamed mixture, alternating with the soy milk, and continuing to beat the mixture well between each addition. Add the vanilla and almond extract and beat the mixture an additional 2 minutes at medium speed. Gently stir in the confettis.

Pour the batter into the prepared pan, cupcake pans or mini-Bundt pans. Bake at 350 degrees for 30 iminutes (Less for the cupcakes or Mini-bundts...) or until an inserted toothpick comes out clean.
Glaze or frost as desired.
________________

The second recipe (for the chocolate cupcakes) is much healthier and probably a little more labor-intensive, but my 12-year-old managed to make these just fine with no help from me...

We chose to use it because we happened to have the ingredients available. (I was SO not in the mood to go to the grocer at 7:PM!!). Ironically, I got this recipe from a "Healthy Cooking" class that I attended years ago. I've since modified the recipe quite a bit to suit my preferences.

This makes a really dense, rich, moist chocolate cake/cupcake. Just the way chocolate should be...

I included a chocolate icing recipe here, though for this particular event, we used store bought frosting that we had on hand. (Read your labels, but most store-bought frostings are "accidently" vegan, though they will be loaded with all sorts of gacky hydrogenated oils and such).


Almost-Healthy Chocolate Cupcakes

1 cup whole-wheat pastry flour
1 cup unbleached all-purpose flour
1/4 cup cocoa powder (or you can use carob powder if you're in to that sort of thing, which I am not!)
1 teaspoon baking soda
1 teaspoon salt
1 cup chocolate soymilk
3/4 cup sugar (the recipe calls for honey, or pure maple syrup)
1/2 cup hot, well-cooked long-grain brown or white rice
1/4 cup canola oil
1 teaspoon pure vanilla extract

Preheat oven to 350 degrees.
Oil two 8" round cake pans or 12 cupcake tins; set aside.

Whisk together dry ingredients in a large mixing bowl; set aside.
Combine wet ingredients in a blender container, and blend until very smooth.
Add wet ingredients to dry ingredients, and stir to combine. Pour batter into prepared pans. Bake 20 to 25 minutes for cakes, 15 to 20 minutes for cupcakes, until a toothpick inserted in the middle of the cake or cupcake emerges clean. Cool slightly before turning onto a wire rack.
Glaze with Chocolate Glaze.

___________

Glaze/Icing
1 cup sugar
6 T corn starch
4 T cocoa
1/2 t salt
2 T oil
1 cup water
1/2 t vanilla
Mix sugar, cornstarch, salt, and cocoa in a medium sauce pan. Whisk in the water. Heat over medium until it gets thick and starts to boil. Boil for 1-2 minutes (make sure you don't boil too long, or it will set like toffee). Remove from heat and stir in oil and vanilla. Cool and spread on cooled cake. If you prefer a thinner glaze, add more water.

Thursday, February 09, 2006

Shortbread Cookies

<-- My littlest Sprout takes cookies in to school tomorrow for a Valentine's party.

Instead of something more traditional (well, OK, I'm not exactly sure what would be considered "traditional" treats for Valentine's anyway - pink cupcakes? blechh...yeah...) she wanted to make shortbread cookies.


So naturally I hadn't tried "veganizing" my shortbread recipe yet, and didn't have time to experiment, but we tweaked it only slightly and it turned out GREAT. Here ya go...

VEGAN SHORTBREAD CUT-OUT COOKIES

-- 3/4 cup of margarine (the kind in cubes, like Earth Balance Buttery Sticks - NOT the softer tub-style)
-- 2 TB (or a bit less) coconut oil
-- 1/2 cup powdered sugar
-- 2 cups flour (sometimes I use whole wheat pastry flour)
-- 1/4 teaspoon vanilla (oh please use real vanilla!)

1. Preheat oven to 350F and lightly grease a baking sheet.
2. Cream margarine and sugar very, very well.
3. Add vanilla.
4. Add flour slowly.
5. When well incorporated and forming a dough, roll into a ball and refrigerate for at least 20 minutes, to overnight. (We couldn't wait much longer than 20 min!)
6. Flour surface and rolling pin, and roll out a 1/4 of the dough out a time to between 1/4 and 1/2 in. thick. (Thicker will be more dense and shortbread-like, thinner will be more crisp, we made ours pretty thick!) Cut out using cookie cutters of choice.
7. Bake until the edges begin to brown, 6-10 minutes. Keep an eye on it, depending on how thick you roll the dough.

Sunday, January 29, 2006

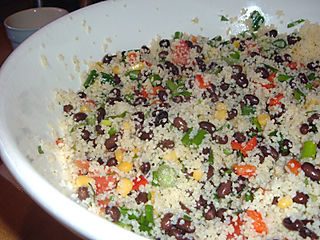
Confetti Couscous


Did a major cupboard clean-out last week and discovered a package of couscous I had meant to use at Thanksgiving. Well, tofurky day is long past, but I got inspired anyway and made my favorite couscous salad. It's actually more of a summer-time thing. Maybe?
I don't always use all the veggies, sometimes more of one than another, it depends on my mood and what I have in the fridge.

At any rate, I could eat this stuff 3 meals a day, the girls like it for the most part and it's pretty and colorful, ...yeah, I should be inspired more often!

Confetti Couscous
1 cup uncooked couscous
2 cups (or one can) cooked black beans, well drained and rinsed
1 stalk celery, chopped
1 small red pepper, chopped
1 cup cooked corn (or mini-corn is cool too!)
2 medium tomatoes, diced (sometimes I use little yellow pear tomatoes)
1/2 cup chopped green or Kalamata olives
1/2 cup chopped fresh parsley
2 green onions, finely sliced or 1/4 cup minced purple onion
3 Tb. olivie oil
1 Tbsp lemon juice
salt and pepper to taste
Pour couscous in medium heat-proof bowl. Bring 2 cups water to a boil and pour over couscous. Cover and let stand 15 minutes, then fluff with a fork and allow to cool to room temperature.Transfer coucous to large boil. Add remaining ingredients and toss to mix. Serve at room temperature, or chilled.

Friday, January 20, 2006

BEST EVER, FOOLPROOF, VEGAN CHOCOLATE CHIP COOKIIES!

Perfect Chocolate Chip Cookie recipes are tough to find, even if you're using butter, eggs and whatever else. My 12-year-old adjusted this recipe from an old family favorite one day when she was home alone and wanted to surprise me with some vegan cookies. We didn't exactly have "enough" of several crucial ingredients so she substituted - played around with the recipe and the end result was the most wonderful cookies EVER!!

It is honestly AMAZING (hence the name). Now her recipe is famous among family, friends and her classmates, most of whom had never heard the word "vegan" before - at least now they associate the word with yummy cookie goodness.


_____________

Amazing Vegan Chocolate Chip Cookies

2 1/4 cup all-purpose flour
1 tsp. baking soda
1 tsp. salt
1/2 cup coconut oil
1/4 cup Smart Balance Light (or regular Earth Balance will work fine too, though for some reason SB Light works the best)
3/4 cup white sugar
3/4 cup packed brown sugar
1 heaping Tbsp. flax meal
1 heaping Tbsp. Ener-G egg replacer powder
1/4 cup soy milk
1 tsp. vanilla
2 cups vegan chocolate chips (Good quality vegan chocolate chips are absolutely essential here. Guittard Semi-Sweet is my favorite - available in regular grocery stores and VEGAN!)

1.) Preheat oven to 375 F.
2.) In a small bowl, mix soy milk VERY WELL (until creamy) with Ener-G egg replacer and flax meal using an electric mixer or hand (immersion) blender. Set aside.
3.) In another bowl, mix together flour, baking soda and salt. Set Aside.
4.) In a large bowl, cream together coconut oil, Smart Balance and sugars. Add soy/flax mixture and vanilla. Beat with electric mixer until smooth.
5.) Gradually add flour mixture to liquids. Stir in chocolate chips.
6.) Drop by well rounded teaspoonfuls onto ungreased cookie sheet. Bake for 8 - 10 min. until lightly golden. (Can also be made into bar cookies in 9 X 12 pan)

You can add nuts, raisins, coconut, whatever... but we like them just as they are!

Wednesday, January 11, 2006

Hot Cocoa and a Snow Day


We had an unexpected snow day today which, in Western Washington usually means, oh, about two inches of snow. It also means no work for me and kids home from school.


So, I cleaned out kitchen cuboards suffering from post-holiday chaos (found all sorts of things I need to try cooking with...)and the kids spent most of the day back and forth between the snow and making forty-bazillion cups of peppermint hot cocoa - great way to mess up the kitchen AND use up all those Christmas candy canes I wasn't sure what to do with.

Candy Cane Cocoa

For each cup (multiply this recipe as much as you need)

1 cup soymilk, or other non-dairy milk (we actually used 1/2 almond milk and 1/2 Silk Soy Creamer because that's all we had, it came out DEEE-LISH!)
1/2 T. unsweetened Dutch Process cocoa powder
1 T. sugar
1 T. isolated soy protein powder (optional - if you have it, it makes it extra creamy!!)
1/4 tsp. vanilla or 1/8 tsp. peppermint extract (or the adults can use a shot of Peppermint Schnapps - woo!)
garnish with:
Soy Whip or Hip Whip or whatever
crushed candy-canes left over from Christmas

Blend all ingredients in the blender or with a stick-blender. Heat on stove or in microwave being careful to watch for boil-overs. Garnish with whip "cream" and crushed candy canes or stir with whole candy canes for an even more glorious mess.

Thursday, January 05, 2006

Red and Green for Christmas

Happy New Year!

After spending a couple vacations last year, with friends and relatives in New Mexico, I've been wanting to write down a few of the ideas and recipes I've come away with. The food there is amazing; colorful, flavorful, creative and full of ingredients or combinations I'd never tried. I fell absolutely in love with (among other things) the green chiles that New Mexico is so famous for.

There are as many definitions for "chile"as there are people in New Mexico, but most simply it's either "red or green". Either its the famous green New Mexico-grown chile peppers (especially the Hatch chiles, grown in southern New Mexico) that are roasted over a fire until their skins blacken and char. The skins get peeled off and the soft chiles are chopped and cooked in whatever recipe.
Its counterpart, the red chile, which is the same pepper, but picked later in the season so it is red (ripe) and then dried, ground into powder and blended with liquid to make a red sauce. You also see the dried red pods made into beautiful chile ristras (strings or wreaths of chiles) for sale all over Santa Fe and Albuquerque's Old Town. (Well, everywhere actually, I just happened to see them a lot in the "tourist-y" places because that's where I went mostly, this trip).

Spanish settlers brought the chile pepper into what is now New Mexico in the 1600s, and it is now the state's largest agricultural crop; it's consumed at every meal, celebrated in songs and at festivals, and is the subject of the Official New Mexico State Question, "Red or green". The question refers to the color of chile you want on your food and you'll get asked at every Mexican (or New Mexican, sorry!!) restaurant.

I think the reason the rest of us know so little about New Mexico's green chiles is because they don't transport so well. They're a fresh and seasonal vegetable, (well, yes, technically a fruit) and the only way to really appreciate them is freshly fire- roasted, though the fire-roasted and frozen variety are pretty close if that's your second choice. Canned slimy green chiles are not even an option.


OK then. So this past Christmas break, I spent some time in New Mexico, and returned with my tummy full of green chile and my brain full of recipes, ideas and happy memories.

_______________


(I know, the picture doesn't look
all that great, but it IS yummy
stuff!)

OK, so, first of all, one of my new favorites, Green Chile Stew. This stuff is addictive, it doesn't have to be SUPER spicy but I tend to like it that way. With all those Vitimin-C-filled chile peppers, it's great for a cold and (I discovered), it's sorta like meatloaf or apple pie, there are hundreds of slightly different versions of the "official" recipe! Normally it has pork or something dead and disgusting in it, but here's the vegan version that I learned from one of my wonderful veggie freinds.


New Mexico Green Chile Stew

1 pkg. Boca crumbles or 1 pkg. Morningstar Farms Beef Meal Starter Strips or if you prefer something else, go for it...
2 Tbsp. vegetable oil
1 large onion, chopped
2 cloves garlic, minced
2 cups roasted, peeled and chopped New Mexico green chiles
1 large potato, peeled and diced
2 tomatoes, peeled and chopped
3 to 4 cups water
1/4 teaspoon dried oregano, Mexican preferred


Place the Crumbles or Meal Starter strips in a skillet and brown a bit in the oil, remove and place it in a kettle or stock pot.
Put the onions in the skillet, adding more oil if necessary, and sauté until they are browned. Add the garlic and cook for an additional couple of minutes. Remove them from the skillet and add to the 'meat'.

Pour a little of the water into the skillet, bring to a boil, and deglaze. Pour the liquid over the 'meat'. Add all the remaining ingredients, and simmer for an hour or so, 'till the potato is soft.
________________

Another new favorite for me is Posole. (Also spelled 'Pozole'). Posole is a New Mexican soup traditionally served on Christmas Eve. It is made with a type of corn, hominy really, that's been treated with lime (I know, sounds weird). You buy it dry, soak it forever, and when the kernals start to burst, it's time to cook the rest of the soup. Posole is also 'traditionally' made with pigs feet. Obviously I left those out (UGH!). I love creating my own traditions with veganized versions of regional and cultural favorites and this is a great example, though in all honesty, I got the recipe - or general idea - from a friend who's lived in NM basically all his life.

My 6-year-old goes NUTS over this stuff, she'll eat three bowlfulls in a row, with really HOT green chile sauce (though I think it's 'traditionally' served with red, once again, there we go, breaking tradition).

I have to buy the dried posole corn or hominy (or cacahuazintle is technically what it says on the package) in New Mexico, or at a tiny little specialty market in Seattle, or bribe a friend to mail some to me, so we don't make this as often as my kids would like. Canned hominy is JUST not the same. I tried it, it was AWFUL!


POSOLE SOUP

2 c. posole or dried hominy (or cacahuazintle as my package says), picked over for dirt or stones
1/4 c. vegetable oil
2 c. chopped onion
2 T. minced garlic
1 oz. New Mexico dried red chile pods, (4 or 5 pods, stems and seeds removed)
5 c. vegetarian UNchicken broth
pinch of cumin and Mexican oregano
1/2 c. coarsely chopped cilantro
2 t. salt, or to taste

Soak posole/hominy corn in a large amount of water overnight (it will swell quite a bit!!). The next morning, cook posole in water in crockpot on low for about another 12 hours until the kernels have softened and begin to burst. Drain the posole and rinse well.
Heat the oil in a 6-quart pot and sauté the onions until golden. Add the garlic and sauté for 1 minute. Add the posole, dried chiles, broth, cumin and oregano. Bring to a boil. Reduce the heat and simmer for 30 minutes. Add the salt, to taste, and continue cooking for 30 minutes. Stir in the cilantro. Taste and adjust seasonings.
Serve with warm red chile sauce on the side. Yum!
**In the picture I took above, I had added some red and green bell peppers for a little extra interest though they're not necessary.

Tuesday, December 20, 2005

Vegan Christmas Baking: GINGERBREAD!


VEGAN GINGERBREAD!
My daughter celebrates her birthday at the end of November every year with a "Gingerbread-House Making Party" for several of her (not so little anymore) friends. It's always a HUGE hit and the girls spend hours making beautifully (?) decorated little houses.

I realize some of the candies you'll see pictured are NOT vegan but the gingerbread is, and actually VERY tasty. Besides making the sheets of gingerbread for the houses, I always make plenty extra, just to be baked into cookies that we eat...


GINGERBREAD COOKIES

1/3 cup canola oil
3/4 cup sugar
1/4 cup molasses
1/4 cup plain soymilk
2 cups whole wheat pastry flour or all-purpose flour (or a mix of both)
1/2 teaspoon baking soda
1/2 teaspoon baking powder
1/2 teaspoon salt
spice blend:
1/2 teaspoon each ground nutmeg, cloves and cinnamon
1 1/2 teaspoons ground ginger

Directions:
In a large bowl beat together oil and sugar for about 3 minutes. Add molasses and soymilk. The molasses and soymilk won't really blend with the oil but that's ok.

In a seperate bowl, sift together all the other ingredients.

Add the dry ingredients to the wet in batches. MIx together with a firm spoon or spatula until well combined. You should have a pretty stiff dough. Flatten the dough into a disk, wrap in plastic wrap and chill for an hour or up to 3 days in advance. (If you chill longer than an hour you may want to let it sit for 10 minutes to loosen up a bit before proceeding).

Preheat oven to 350 F. Lightly grease your cookie sheets.

On a floured surface roll you dough out to a little less than 1/4 inch thick. You can do this in 2 batches if you don't have the space. Cut out your shapes with your cookie cutters and gently place on cookie sheets (if you are using them to decorate with remember to cut a hole with a straw or something before baking).

Bake for 8 minutes.Remove from oven and let them cool for 2 minutes on the baking sheet then move to a cooling rack. Wait until they are completely cool before icing.

If baking "walls" for a gingerbread house, make cookies 1/2 inch thick and bake at 300 F until very firm - about 15 minutes or longer. Then let cook on a rack overnight.

Friday, December 16, 2005

Christmas baking! YAY! ~~ "Cranberry-Orange Bread"


Just finished making this in it's new vegan version, and it turned out scrummy! We used to make this all the time and I'm glad I figured out how to vegan-ize it easily. I wish you could smell it, it's made the whole house smell like Christmas! I think I'll make some small loaves to give out for the Holidays.


Cranberry-Orange Bread

2 cups all-purpose flour
1 cup vegan sugar
1/2 teaspoon salt
1 1/2 teaspoon baking powder
1/2 teaspoon baking soda
2 Tblsp vegetable oil
hot water
1/2 cup unsweetened (fresh squeezed) orange juice
(I use juice from those tiny tangerines you get around the holidays)
1/2 Tblsp orange peel, grated
Ener-G Egg Replacer for 1 egg
1 cup cranberries, coarsely chopped (fresh or frozen)
1/2 cup hazlenuts, chopped

Directions: Preheat oven at 375 F.
Grease and flour loaf pan.
In a large bowl, mix dry ingredients (flour, vegan sugar, salt, baking powder and baking soda).
In a small bowl, add nuts, cranberries and 1/2 cup of dry mixture to coat the nuts and berries.
In a measuring cup, add oil and top-up with hot water to make 3/4 cup. In a medium bowl, mix oil/water mixture, orange juice, orange peel and Ener-G Egg Replacer. Combine liquid mixture to dry mixture (don't overmix!).
Fold in nuts and berries. Bake for 1 hour.

Friday, November 11, 2005

More "Pumpkin-y-ness"...


Just made these for breakfast this morning. The Sprouts loved 'em! (Tried to post the photo I took, but I may have to come back to that tomorrow.)


PUMPKIN PANCAKES WITH CIDER SYRUP

WARM CIDER SYRUP:
3/4 cup apple cider or juice
1/2 packed brown sugar
1/2 cup corn syrup
2 Tbs Earth Balance margarine
1/2 tsp lemon juice
1/8 tsp ground nutmeg
1/8 tsp ground cinnamon

PANCAKES:
1 cup all-purpose flour
1 Tbs sugar
2 tsp baking powder
1/8 tsp salt
1/2 tsp ground cinnamon
1/2 tsp ground nutmeg
1/8 tsp ground cloves
3 tsp Ener-G egg replacer
4 tbs warm water
1 1/3 cup soy milk
1/4 cup canned pumpkin
2 Tbs canola oil

Instructions:------------

SYRUP:In a saucepan, combine all the syrup ingredients.
Bring to a boil over medium heat, stirring occasionally.

Reduce heat simmer uncovered for about 20 minutes until slightly thickened. Let cool for 30 minutes before serving. Syrup will thicken as it cools.

Any syrup you don't use can be stored in a sealed container in the refrigerator. Just warm it in the microwave for 1 minute before serving. If it gets too thick you can add a little more cider to thin it.

PANCAKES:Sift together all dry pancake ingredients except for egg replacer.
In another bowl whisk together the pumpkin, soy milk and oil.

Mix together egg replacer and water and stir it in with the pumpkin mixture. Stir dry ingredients in with wet ingredients.

Ladle batter onto a hot greased griddle. Turn when the bubbles on the top start to pop and the outer edge of the pancake starts to look set.
Serve with Earth Balance margarine and warm cider syrup.

Don't be tempted to add extra pumpkin. Too much pumpkin will cause the pancakes not to cook all the way through. Also they may take a little longer too cook than traditional style pancakes so be patient and wait till the sides start to look a little cooked and the bubbles on top actually start popping.

The cider syrup is very sweet. A little bit goes a long way, so don't pour too much on at once.

Monday, November 07, 2005

Pumpkins and Vegan Thanksgiving!


Yay! I realized a few weeks ago (around Halloween actually) that I've been doing the 100% VEGAN thing for several months now and not even noticing it all that much.
In other words, it wasn't as hard as I was thinking it'd be.

So with Thanksgiving rolling around, I thought I'd post some of the recipes I think we'll be using this year. Recipes I've used for years and just "veganized" to fit my new style of eating.

Since we're big pumpkin/squash fans around here, I thought I'd devote a little space to some of our favorites. (I usually try to grow my own squash - OR liberate a few from the vast acreage my Mom calls a garden.) We do eat things OTHER than pumpkin for Thanksgiving, but I'll save those for another day.

I take the small 'Sugar Pie' pumpkins, quarter them, scoop out strings and seeds and bake at 350 degrees until soft when poked with a fork. After they've cooled, I scoop out of the skin and mash with a potato masher, or for soup or pie, puree with my 'boat motor' immersion blender. If more liquid is needed, I add veggie broth or coconut milk or whatever liquid the recipe calls for.


OK, here we go -
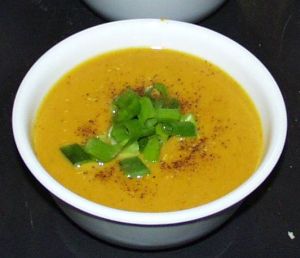
Pumpkin Soup!

We make this often throughout the fall, not just for Thanksgiving.
My kids BEG for it. (Great source of fiber and those "yellow veggie" antioxidants and Vit. A too!) You can spice it up or down, according to how hot you like your curry.


CURRIED PUMPKIN SOUP


2 Tbsp. margerine
1 small onion, chopped
1 small garlic clove, pressed
2 tsp. curry powder or paste, or to taste
1/2 tsp salt
1/4 tsp freshly-ground black pepper
cayenne to taste
2 Tb. sugar
1 Tb. very fine grated fresh ginger
1 can vegetarian chicken broth - (14 1/2 oz)
PLUS1 can water
3 cups pumpkin or squash puree - either from a can, frozen or bake/steam your own and mash (my fav.) **See Note following
3/4 cup coconut milk (or 1 can of it is fine, so there's no waste)

Instructions:--------------
Melt margerine in a large saucepan over medium heat.
Cook onion 5 minutes, until softened.
Add garlic, curry powder, ginger, salt and pepper and cook 1 minute more.
Add broth, sugar, water and puree; mix well.
Reduce heat to low.
Cook, stirring occasionally, for 20 minutes.
Stir in coconut milk.
Puree soup in blender in batches until smooth.
Heat through before serving.
Adjust seasonings - sometimes needs a pinch more sugar, or salt or cayenne - depending on your tastes.


**I cut small sugar pumpkins or Kabocha squash in quarters and bake until soft, then puree with a little vegetable broth for this recipe.


~~~~~~~~~~~

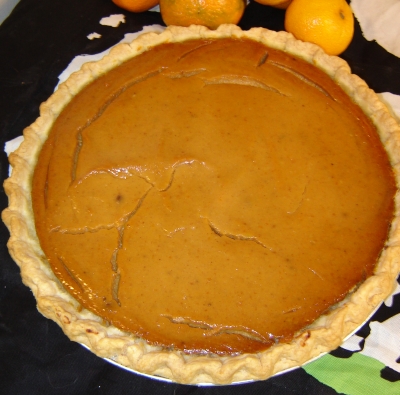
Next up is your classic Thanksgiving Pumpkin Pie (only vegan). I've got to confess, we've tried all those tofu-filled vegan pumpkin pie recipes out there, and while I DO like tofu... a LOT... I don't care for it all that much in a pie.
I think you CAN taste the tofu, despite claims from other vegans that it's "exactly the same". So with the help of a half-dozen Internet resources, my daughter and I came up with this non-tofu version and we think it's GREAT.


VEGAN PUMPKIN PIE
(Preheat oven to 350 degrees F.)

--One 9" unbaked pastry crust (No recipe for this yet. Stay tuned, I'll prolly add one soon, but Whole Foods has a vegan frozen whole wheat crust and it's GOOD!)
--2 c. solid-pack canned pumpkin (if you use home-cooked pumpkin, drain it forseveral hours through coffee filters or a cheesecloth)
--3/4 cup soy milk (not non-fat)
--1/4 cup coconut milk

--3/4 c. sugar
--1/4 c. cornstarch
--1 T. molasses or maple syrup
--1 tsp. ground cinnamon
--1 tsp. vanilla
--1/2 tsp. EACH ground ginger, nutmeg and salt
--1/4 tsp. ground allspice or cloves.
Pour the filling into the pastry and bake 60 minutes, covering the edges with foil if they begin to brown too quickly.
Cool on a rack, then refrigerate overnight before serving.
It definitely needs to sit overnight but it will set up firm and the flavors will blend nicely!


~~~~~~~~~~~
Stuffed Pumpkin
(great instead of turkey in the center of the table!!)
1 4 - 5 lb. pumpkin or 4 medium-small butternut squashes (about 1 pound each)
3/4 cup raw wild rice, rinsed
1 tablespoon light olive oil
1 heaping cup chopped red onion
1 clove garlic, minced
2 1/2 cups firmly packed torn whole wheat bread
1 tablespoon sesame seeds
1/2 teaspoon each: dried sage, dried thyme
1 teaspoon seasoned salt, or to taste
1 cup fresh orange juice


Preheat the oven to 375 degrees.
Cut off top of pumpkin and scoop out seeds (save those and roast later!)
Cover pumpkin with foil and bake about an hour or until easily pierced with a knife but still firm.
(Or halve small squashes and scoop out seeds. Place cut side up in shallow baking dishes and cover tightly with covers or more foil. Bake for 40 to 50 minutes, or until easily pierced with a knife but still firm.)
In the meantime, bring 2 cups of water to a boil in a saucepan. Stir in the wild rice, reduce to a simmer, then cover and cook until the water is absorbed, about 40 minutes. Heat the oil in a skillet.
Add the onion and garlic and sauté until golden. In a mixing bowl, combine the cooked wild rice with the sautéed onion and the remaining ingredients.
When the pumpkin or squashes are cool enough to handle, scoop out the pulp, leaving firm shells about 1/2 inch thick. Chop the pulp and stir it into the rice mixture.
Taste and adjust seasonings. (I like a LOT of sage and garlic so usually add more).
Stuff the pumpkin or squashes, place in foil-lined baking dishes, and cover.
Before serving, place in a preheated 350 degree oven. Bake for 15 to 20 minutes, or just until heated through (longer for pumpkin, less for squashes).

Serve as your Thanksgiving centerpiece and hear everyone rave...

VARIATION: To add drama to this (drama is always good, isn't it?), try it with other squash varieties. Hubbard squash, delicata, sweet dumpling and golden nugget are just a few ideas - I use whatever's available...
~~~~~~~~~~~~~~

OK, and my last recipe for our pumpkin adventure - don't freak out ...Pumpkin Lasagna!
Seriously, I found the recipe a few weeks ago and thought it looked pretty good. My kids did not, however, so when I made it, it was served to very skeptical faces; But I'm happy to report the older girls loved it (as did I) and it's on our "list" of new Autumn pumpkin favorites!
ETA: I just realized I wrote this as I was making/veganizing it the first time, so the ingredients are all out of order, I'll probably come back and edit some time soon, you can probably still figure it out with no problem, I have faith in your cooking skills if you've made it this far!!!.
PUMPKIN VEGGIE LASAGNA


4 ounces vegan Tofutti cream cheese
3/4 cup pumpkin puree
1 Tb. cornstarch

8 ounces silken tofu
2 tbsp. lemon juice
1 tsp. Italian Spice Blend
1 tsp. sage

1-2 tsp. chopped garlic
salt and pepper
dash nutmeg
1/2 cup shredded soy mozzarella,(freeze it first if it won't shred)
1/4 cup nutritional yeast
1/2 cup chopped and defrosted frozen spinach
12 no boil pasta lasagna-noodle sheets
1/2 large onion, chopped
8 ounces mushrooms, sliced
3 cups tomato sauce
1 tsp. sugar
1/2 cup soy milk
1/2 cup soy cheese, shredded

Instructions:
Preheat oven to 350 degrees.
Mix the tomato sauce, soymilk and sugar together. It should look reddish pink.
Place a small amount of this sauce in an oiled 9x12 baking pan.
Lay 3 pasta sheets in there, take a fourth and break to fill in bottom of pan.
Mix the tofu, cornstarch,Tofutti cream cheese, lemon juice, garlic, salt and pepper together with a hand mixer. (This is your "ricotta" substitute.)
Add in the pumpkin, mushrooms, vegan mozzarella, spinach, onions, nutmeg, sage and Italian Spices, nutritional yeast and mix with the "ricotta cheese". Put a layer of this mixture in the pan.
Continue to layer sauce, vegetable-pumpkin-"cheese" mixture, noodles, and sauce until all is used up.
Top with sauce. C
over with foil and cook about 50 minutes or so. Remove foil, sprinkle with the soy cheese.
Bake until cheese melts, (if it does, which vegan cheese doesn't too well...) but about 10 minutes or so. Let stand for about 10-20 minutes and serve.

Wickedly rich and SOO yummy! All you need is a salad. (I did a spinach salad with shaved pieces of jicama and it was perfect.) BTW, the lasagna is actually MUCH runnier/gooier than my picture, I confess, I cleaned up the plate to take that pic!

Wednesday, October 05, 2005


Me and the girls around mid October I think?
Just thought I'd post SOMETHING since I haven't been very inspired lately. Posted by Picasa

Monday, May 09, 2005

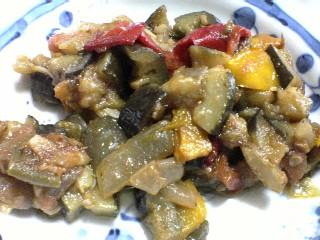
Ratatouille

I love eggplant and the Mediterranean flavors of garlic, olive oil and fresh herbs, so this is one of my favorite recipes, especially in the summer when I have a bunch of fresh garden-ripened tomatoes.
I've made this recipe for years and never realized it was specifically "vegan" until now.
1 large onion, chopped
Garlic and olive oil, to taste
1 large eggplant, cut into cubes (salted, drained, and blotted dry if desired)
2 red peppers, sliced, (I use red and yellow for more color, if I can find them)

3 large tomatoes, chopped
2 zucchini, chopped
1/4 - 1/2 cup shopped Kalamata olives
2 Tb. capers
2 cloves garlic, crushed
Salt and pepper to taste
"Herbes de Provence" (Rosemary, Basil, Marjoram, Savory, Thyme) I use fresh, from my patio herb "garden".

Sauté onion and garlic in olive oil, add the eggplant and fry a few minutes.
Add the peppers, tomatoes and zucchini.
Add olives, capers, garlic and as much of the chopped herbs as you like. Salt and pepper to taste.
Let cook over medium-low heat for 30 minutes, stirring occasionally. Serve hot as a main dish, or cold as a side dish.
Can also be used to stuff into pita bread, roll up in tortillas, or make into a vegetable pot pie.

Sunday, April 03, 2005

Good Gravy! (Who says you need dead cow juices to make it?)

Good Gravy!

I make AWESOME gravy, if I do say so myself... Awesome VEGAN gravy!!
I frequently have people ask how I make gravy without turkey or roast drippings - well, actually even those nasty salty little flavored envelopes at the supermarket are usually vegan, (on accident), but why not make it from scratch?
It tastes SOOO much better! And without the meat drippings, it's a whole lot better for you too, right?!!
Non-Cow Gravy


28 oz. Vegetarian "beef" or vegetable broth (I use "Imagine" Foods in the aseptic box, but you can mix your own from bullion and water or do whatever you want).
1 cup coarsely chopped onion
1/2 cup coarsely chopped fresh mushrooms
1/4 cup coarsely chopped celery
1/4 teaspoon thyme
1/8 to 1/4 teaspoon black pepper
Cooking spray
2 T. all-purpose flour

Combine first 6 ingredients in a medium saucepan.
Bring to a boil;cook 15 minutes or until liquid is reduced to 2 cups. Strain brothmixture through a sieve into a bowl; discard solids.(I know, sounds wasteful - if you want, you can make chunky vegetable gravy and leave them in, in that case, use ike 2 cups of chopped mushrooms).

Coat a medium skillet with cooking spray; place over medium-high heat until hot. Add flour, and cook 2 minutes or until browned,stirring constantly. Transfer flour to a large bowl, and cool completely.

Add 1/4 cup broth mixture to flour; stir well with a whisk. Add remaining broth mixture, stirring well with a whisk.
Pour mixture into skillet; place over medium-high heat.
Bring to a boil; reduce heat, and simmer 3 minutes or until thick, stirring constantly. Serve with mashed potatoes, rice, noodles, veggie burgers, or "meat" loaf.

To make this into Stroganoff:

Make above gravy.
Add 2 cups sauteed mushrooms. Stir in 1/2 container Tofutti Sour Cream and heat gently. Serve over rice or noodles. YUM!